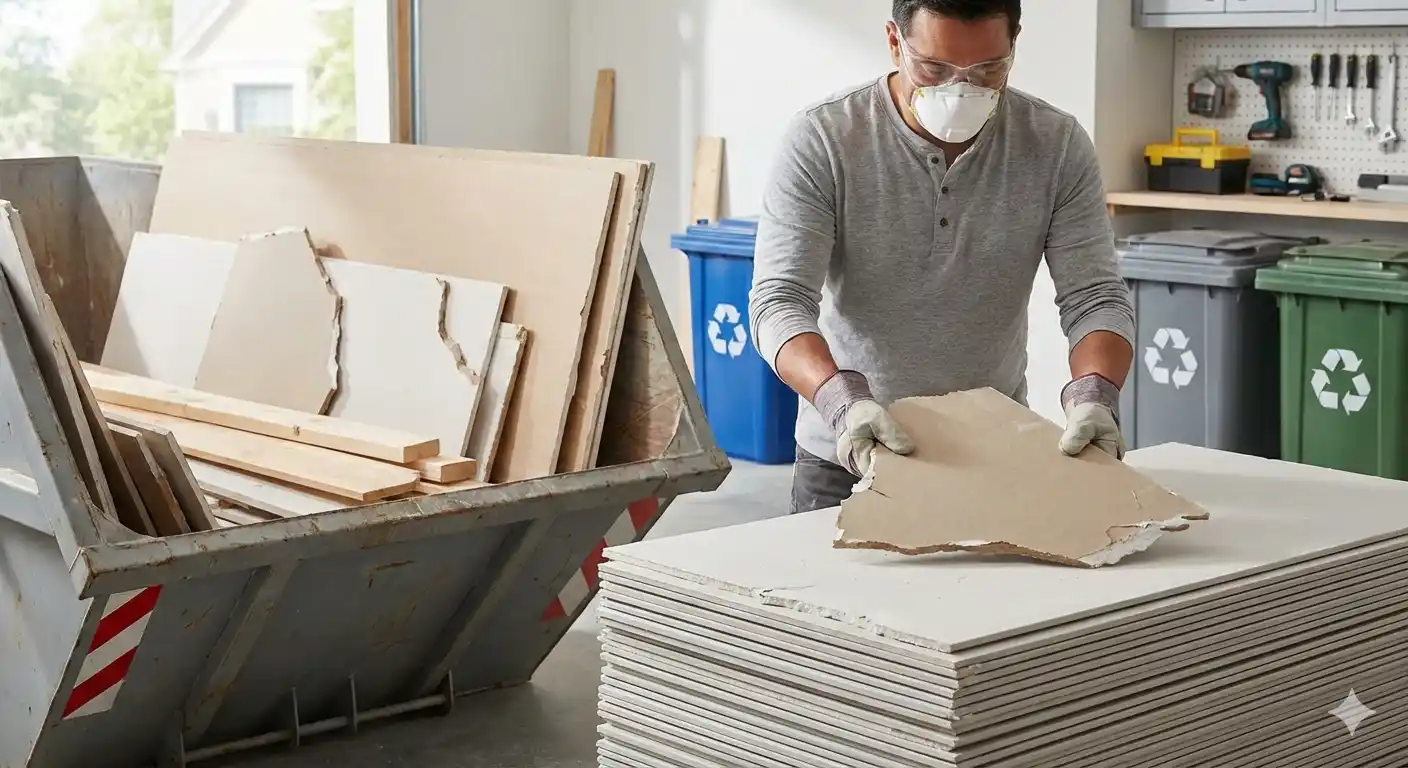
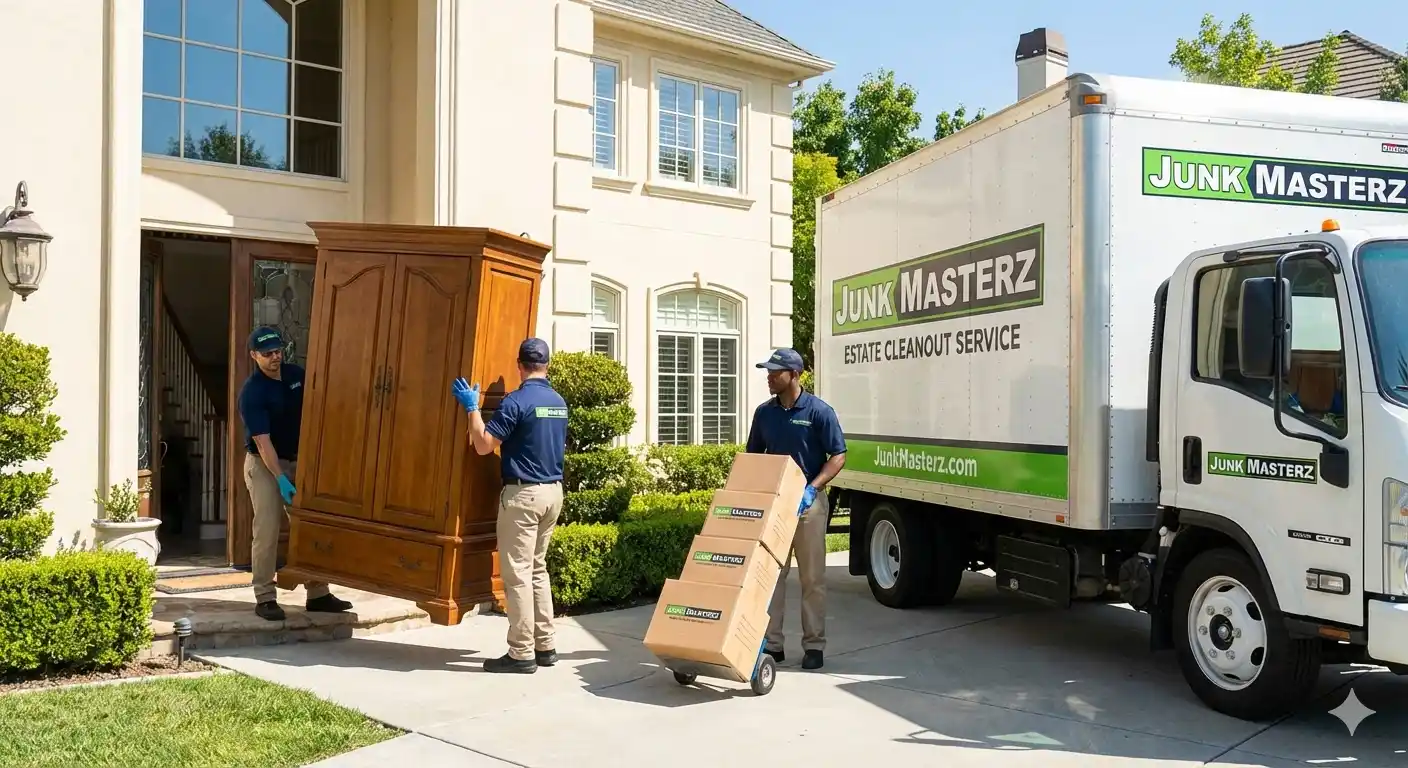
How

How to Get Rid of an Old Swing Set the Smart and Safe Way

Has your backyard started to look like a playground graveyard? We all remember the joy that first swing set brought to the kids. But as time passes, those once-loved slides and swings become rusty, wobbly, and even dangerous. Learning how to get rid of old swing set structures is a common challenge for homeowners. It’s not just about aesthetics; it’s about safety and reclaiming your outdoor living space for new memories, like a fire pit or a garden.  In this guide, we will explore everything from a DIY swing set teardown to professional junk removal services. You will learn about the latest swing set disposal methods, hidden costs, and even how to use modern AI tools to find the best local recycling centers. Let’s get that yard back! Should You Remove or Repurpose? Before you grab a hammer, take a close look at the structure. In the world of modern home care, we call this “Assessment.” Is the swing set truly at the end of its life, or does it just need a “glow-up”? Checking for Safety Safety is the most important factor. If you have a wooden set, check for “soft spots.” Use a screwdriver to poke the wood near the ground. If it sinks in easily, you have wood rot. For metal sets, look for deep, flaking rust at the joints. If the structural integrity is gone, you must remove it. A wobbly set is a hazard for any child who might wander into your yard. The Home Value Factor Believe it or not, an old, decaying swing set can actually lower your home’s value. Real estate experts in 2026 often suggest removing “dated” play structures before listing a home. A clear, well-maintained lawn is a “blank canvas” for buyers. On the other hand, if the frame is made of high-quality cedar and is still sturdy, you might consider repurposing swing set ideas. Making the Decision Ask yourself: Do kids still use it? If not, it’s taking up valuable real estate. Is it a safety risk? Rot and rust are non-negotiable “remove” signals. Is it an eyesore? If you cringe every time you look out the window, it’s time to act. DIY Disassembly Guide If you’ve decided on a DIY swing set teardown, preparation is key. This is a big job that requires the right tools and a bit of patience. Essential Tools List Don’t start without these: Safety Gear: Gloves, goggles, and sturdy boots. Wrenches & Sockets: Most sets are held together by 1/2-inch or 9/16-inch bolts. WD-40 or Rust Penetrant: Essential for bolts that haven’t moved in ten years. Reciprocating Saw (Sawzall): If the bolts are too rusted to turn, you’ll need to cut through them. Sledgehammer: Useful for breaking up concrete footers. A Helper: Never try to dismantle the main “A-frame” alone. Step-by-Step: How to Disassemble a Swing Set Remove Accessories First: Take off the swings, slides, and any plastic “fort” parts. These are usually held on by smaller screws. Clear the Area: Move any lawn furniture or toys away. You need a 10-foot “drop zone” around the set. Soak the Bolts: Spray all metal connectors with a rust penetrant and let it sit for at least 30 minutes. Top-Down Approach: Start with the roof and the highest crossbeams. This keeps the structure stable for as long as possible. The Main Frame: With your helper holding one side, unbolt the main crossbeam from the legs. Carefully lower the heavy beams to the ground. Concrete Footers: This is the hardest part. If the legs are buried in concrete, you may need to dig around them and use a pry bar or sledgehammer to break the concrete loose. Safety Tips for DIYers Keep a close eye on “stored energy.” A beam under tension can snap back when a bolt is removed. Always wear eye protection because old wood often splinters, and metal sets may drop flakes of rust into your eyes when you look up to unscrew a bolt. Cost Breakdown: DIY vs. Professional When figuring out how to get rid of old swing set debris, the price tag often dictates the path. Here is what you can expect to pay in 2026. The DIY Price Tag DIY isn’t “free.” You have to consider: Tool Rental: $50–$100 (if you don’t own a saw or heavy-duty wrenches). Dumpster Rental: A 10-yard dumpster typically costs $300–$500. Landfill Fees: Some local dumps charge by weight, usually $50–$100 per ton. Your Time: A full disassembly usually takes a weekend (10–16 hours). Professional Removal Costs Hiring a company like Junk Masterz provides a different value. Average Service Cost: Most junk removal services charge between $200 and $600 for a full “demo and haul.” Special Factors: If the set is anchored in deep concrete, expect an additional labor fee of $75–$150. The Benefit: They bring the tools, the muscle, and the truck. You just point, and it disappears. Expense Type DIY Cost Professional Cost Labor $0 (Your time) $150 – $300 Disposal/Dump Fees $100 – $400 Included Equipment/Tools $50 – $150 Included Total $150 – $550 $200 – $600 Donation & Selling Options If your swing set is still in good shape, why throw it away? There are plenty of swing set donation ideas and ways to make a few bucks. Selling for Cash In 2026, the secondhand market is thriving. Use apps like Facebook Marketplace or Nextdoor. The Golden Rule: List it as “Must Disassemble and Haul.” This saves you the work! Pricing: A used, high-end wooden set can sell for $100–$400. Metal sets usually go for $50 or even “free to a good home.” Where to Donate Donating is a great way to support the community. However, organizations like Goodwill or The Salvation Army rarely accept used outdoor play equipment due to liability. Better Options: Check with local preschools, churches, or “Buy Nothing” groups in your neighborhood. Liability Note: Always provide the original manual if you have it. This ensures the new owner can set it up safely. Recycling &

How to Get Rid of Old Furniture: A Complete Guide for Homeowners

Upgrading your home is exciting—but those old sofas, dressers, and worn-out chairs can quickly become a clutter nightmare. You can’t just shove them in the trash, and leaving them sitting around only takes up space and drains your energy. Whether your furniture is gently used, broken, or falling apart, knowing how to get rid of old furniture efficiently and responsibly is a game-changer. From donating and selling to recycling or hiring a professional, there are smart ways to clear out your home without stress, waste, or unnecessary costs. In this guide, we’ll show you the cheapest ways to get rid of old furniture, the best disposal methods, and eco-friendly tips that keep your home organized and your conscience clear. By the end, you’ll have a step-by-step plan to declutter quickly, safely, and effectively—no heavy lifting headaches required! HOW To Get Rid of Old Furniture? Old furniture doesn’t just take up space—it can weigh down your home and your mindset. Whether it’s a worn-out sofa, a broken dresser, or a pile of chairs that no longer serve you, clutter can make your living space feel chaotic. Getting rid of it isn’t just about trash—it’s about making room for a fresh, organized, and functional home. The smartest way to declutter is to combine strategy and efficiency. Start by sorting your furniture by condition—what’s still usable, what can be repaired, and what’s beyond saving. Usable items can be donated to charities or resold, turning clutter into cash or goodwill. Broken or bulky pieces should be handled safely—through recycling programs or professional junk removal services—so you don’t risk injury or create unnecessary waste. By planning, you can get rid of old furniture quickly, safely, and even cost-effectively, while keeping your home clean and clutter-free. Step 1: Assess Your Furniture Before throwing out any furniture, take a moment to evaluate its condition: Is it still usable? Is it slightly damaged but repairable? Is it broken or unsafe? This simple check will guide your next steps. Usable furniture can be donated, sold, or given away. Broken or heavily damaged pieces may need recycling or junk removal. Sorting your furniture first makes the entire process easier and helps you find the cheapest way to get rid of old furniture. Step 2: Donate Old Furniture One of the most responsible ways to dispose of furniture is donation. Many charities and non-profits accept gently used furniture. This includes: Local shelters and community centers often need beds, sofas, and tables. Thrift stores – Goodwill, Salvation Army, or other local organizations. Online “free” groups – Facebook Marketplace or Freecycle for quick local pickups. Donation is not only eco-friendly, but it can also earn a tax deduction if you itemize. Make sure your furniture is clean and in good condition for others to use. Pro tip: Some charities offer free pickup, saving you effort and costs. Step 3: Sell Furniture Online If you want to make a little cash while decluttering, selling furniture online is a great choice. Platforms like Craigslist, Facebook Marketplace, OfferUp, or Letgo connect you with local buyers. Tips for selling successfully: Take clear, well-lit photos of the item. Provide a detailed description, including size, color, and condition. Set a reasonable price based on local listings. Respond promptly to inquiries for faster sales. Selling helps keep furniture out of landfills and puts some extra money in your pocket. It’s one of the best ways to get rid of old furniture effectively. Step 4: Bulk Trash and Curbside Pickup Many cities offer bulk trash pickup for large furniture items. Here’s what to keep in mind: Check your municipality’s rules—some allow free pickup, others charge fees. Schedule in advance to guarantee collection. Place furniture in a safe, accessible location for workers. Curbside pickup is convenient, though not always the cheapest method. Some items, especially broken furniture, may be restricted, so always confirm local guidelines. Before placing items outside, check your city’s local bulk waste collection guidelines to avoid fines or missed pickups. Step 5: Hire Junk Removal Services For a hassle-free solution, hiring professional junk removal services is an excellent choice. Companies like Junk Masterz can remove multiple pieces safely and efficiently. Benefits include: Quick removal of large or heavy items. Safe handling of broken furniture. Recycling and donation options included. While costs vary by volume and weight, comparing services can help you find a budget-friendly solution. This method is ideal for busy homeowners who want fast, stress-free disposal. Step 6: Eco-Friendly Furniture Recycling When donation or resale isn’t possible, recycling is the next best step. Many scrap yards and recycling centers accept wood, metal, and even upholstered furniture. Recycling tips: Disassemble large items to separate materials. Remove non-recyclable parts like cushions or padding. Verify local centers accept bulky items and check any fees. Recycling reduces landfill waste and allows materials to be reused. It’s one of the most eco-friendly ways to get rid of old furniture. You can easily find nearby recycling and donation centers to dispose of old furniture in an eco-friendly way. Step 7: Cheapest Ways to Get Rid of Old Furniture If budget is a priority, these options are usually the most affordable: Donation – free pickup by charities. Selling locally – may take time, but it earns money. Municipal pickup – some cities schedule free bulk pickup days. DIY recycling or repurposing – turn old pieces into shelves or garden furniture. Using a combination of these methods helps save money while keeping your home clutter-free. Step 8: Handling Broken Furniture Safely Broken furniture can be hazardous. Follow these steps for safe ways to disposal of old  furniture Wear gloves and protective gear. Disassemble items to reduce bulk and weight. Separate recyclable materials (wood, metal) from trash. Hire a professional junk removal company for large or unsafe pieces.  Conlusion Getting rid of old furniture is not just about clearing space—it’s about creating a more organized and stress-free home. Whether you’re looking for How to get rid of old furniture or the cheapest way to get rid of old

How Much Does Carpet Removal Cost? Average Rates Explained

Most people don’t think about their carpet—until it becomes a problem.It starts with a smell. Then stains. Maybe allergies get worse. Suddenly, you’re asking How much does carpet removal cost?  Old carpet can make your home feel dirty, smell bad, and even affect your health. Over time, it traps dust, pet hair, and stains that are hard to remove. When cleaning no longer works, many homeowners start asking one important question: how much does it cost to remove carpet? The answer is not always simple. Carpet removal prices depend on many factors such as room size, carpet type, labor, and disposal. Some people pay less than $150, while others spend over $2,000 for a full home. Before you start your project, it is important to understand what affects the cost and what to expect. This guide explains everything in a clear and practical way so you can plan your budget and avoid surprises. How Much Does Carpet Removal Cost In 2026, the average cost to remove carpet depends on the size and complexity of the job. Typical price ranges: $0.50 to $1.50 per square foot $150 to $400 per room $800 to $2,500 or more for a full house Small and simple jobs cost less, while larger homes with stairs or glued carpet cost more. For a detailed overview of average carpet removal costs in different areas, visit HomeAdvisor’s guide on carpet removal costs to compare pricing and options. Carpet Removal Cost Per Square Foot Most companies calculate pricing based on square footage. This helps estimate the cost more accurately. Here is a simple breakdown: 100 sq ft room: $50 to $150 250 sq ft room: $125 to $375 500 sq ft area: $250 to $750 1,500 sq ft home: $750 to $2,250 Key points to remember: Larger projects often have a lower cost per square foot Complex jobs increase the price even if the size is small Always confirm if disposal is included Cost to Remove Carpet by Room Each room has different challenges, which affects the price. Common room costs: Bedroom: $100 to $300 Living room: $150 to $500 Hallway: $80 to $250 Stairs: $50 to $150 per flight Basement: $200 to $600 Stairs and basements usually cost more because they require extra time and effort. What Affects Carpet Removal Prices   Carpet removal is not just about pulling up fabric. Several factors influence the final cost. 1. Installation Method The way carpet is installed makes a big difference. Tack strip carpet is easier to remove Glued carpet takes more time and effort The cost to remove glued carpet is higher because it sticks to the floor and may require scraping. 2. Carpet Thickness and Padding Thick carpet or old padding can slow down the process. Light carpet is easier and faster Thick padding may stick to the subfloor This increases labor time and cost. 3. Labor Cost Labor is the biggest part of carpet removal prices. Workers must: Cut the carpet into sections Pull it up Roll and carry heavy material Clean the area This is why professional residential removal cost is higher but more efficient. 4. Disposal Fees After removal, the carpet must be disposed of properly. Important points: Some companies include disposal Others charge extra Fees depend on weight and location This process is known as carpet removal and disposal, which also explains the different ways to dispose of carpet safely and properly. 5. Furniture and Obstacles If the room is not empty, it will cost more. Extra charges may include: Moving furniture Working around heavy items Limited space access 6. Location Prices vary based on where you live. Urban areas have higher labor costs Rural areas are usually cheaper Carpet Removal Cost by Type Different carpet types require different removal methods. Typical cost ranges: Standard carpet: $1 to $2 per sq ft Thick or shag carpet: $1.50 to $2.50 Glued carpet: $2 to $4 Carpet tiles: $0.75 to $1.50 Outdoor carpet: $1.50 to $2.50 Glued carpet is the most expensive because it requires extra work. Hidden Costs You Should Know Many homeowners forget about additional costs. These can increase your total budget. Common hidden costs include: Tack strip removal Adhesive scraping Subfloor repair Mold or water damage cleanup Extra labor for stairs or tight areas These costs can add 20% to 50% to the final price. Knowing how much does it cost to remove carpet in advance can help you stay within budget and make smarter decisions. DIY vs Professional Carpet Removal Choosing between DIY and professional service depends on your time, budget, and effort. DIY Carpet Removal Advantages: Lower cost Flexible timing Disadvantages: Physically demanding Time-consuming You handle disposal Estimated cost: $50 to $150 Professional Carpet Removal Advantages: Fast and efficient No heavy lifting Proper tools and cleanup Disadvantages: Higher upfront cost Estimated cost: $150 to $500 per room Hiring a professional service like Junk Masterz can save time and reduce stress. How Long Does Carpet Removal Take Time affects cost because labor is charged by effort. Estimated time: Small room: 1 to 2 hours Medium room: 2 to 4 hours Large room: 4 to 6 hours Full house: 1 to 2 days Professional teams work faster than DIY projects. Signs You Need to Remove Your Carpet Not sure if it is time to remove your carpet? Look for these signs: Strong odors that do not go away Stains that keep returning Mold or moisture damage Worn or torn areas Increased allergies If your carpet is over 10 years old, replacement is usually the best option. Repair vs Replace Sometimes cleaning is enough, but not always. Choose Cleaning If: The carpet is fairly new Stains are minor No bad odor Choose Removal If: The carpet smells bad Padding is flat or damaged The carpet is old Removal is a better long-term solution. Is Carpet Removal Worth It Carpet removal offers several benefits: Improves air quality Removes allergens and dust Enhances home appearance Prepares for new flooring Increases property value It is a

Fence Removal Cost Guide: How Much Does It Cost to Remove a Fence?

When it’s time to say goodbye to an old, leaning, or rusted barrier, the first thing most homeowners ask is: What is the actual fence removal cost? Whether you are dealing with a sagging wooden picket or a rusted-out chain link, understanding the price tag for “out with the old” is the first step toward “in with the new.” Removing a fence isn’t just about pulling posts out of the dirt; it involves labor, specialized tools, and often heavy lifting. In 2026, the average cost to remove a fence ranges from $300 to $750, or roughly $3 to $7 per linear foot. However, if you are looking at a fence removal and installation cost combo, your budget will look a lot different. Factors That Affect Fence Removal Costs   When you ask a contractor, “How much does it cost to remove a fence?” they usually won’t give you a single number right away. That is because every yard is different. Several key factors change the final price on your bill. Fence Material Fence material has the biggest impact on fence removal cost. Each type requires different tools and labor. Wood fences are usually the least expensive to remove. Panels can often be dismantled piece by piece. Chain link fences take longer because of metal posts set in concrete. The chain link fence removal cost is higher due to cutting, pulling posts, and handling heavy steel. Vinyl fences are lightweight but fragile. Care is needed to avoid breaking panels during removal. Wrought iron or aluminum fences are heavy and often bolted or cemented deeply, raising labor time. Materials affect removal cost because they change how much effort is needed to extract posts and load debris. Fence Length and Height Fence removal cost per foot increases with fence length, but height also matters. A tall privacy fence weighs more and takes longer to dismantle than a short decorative fence. Most contractors calculate the cost to remove a fence using linear feet. Longer fences may lower the per-foot price slightly, but the total cost still increases with size. Post Installation Method This is often the “hidden” cost of fence demolition. Are your posts just buried in the dirt, or are they anchored in big chunks of concrete? Fence post removal cost goes up significantly if a pro has to use a jackhammer or a tractor to pull out heavy concrete footings. Extracting these “plugs” is back-breaking work that adds to the labor hours. Fence Condition Believe it or not, a fence that is falling over might actually cost more to remove. Why? Rotten wood can snap and splinter, making it harder to move safely. A rusted chain link can be sharp and dangerous. If the fence is in one piece, it’s often faster to dismantle. Accessibility and Terrain Can the crew get a truck right up to the fence? If they have to carry heavy panels through a small gate, up a hill, or across a muddy yard, the labor costs will rise. Flat, open ground is always the cheapest environment for fence removal. Local Labor Rates and Permits Where you live matters. Labor in big cities usually costs more than in rural areas. Also, some towns require a permit for fence demolition. While these aren’t always expensive, they are a necessary step to stay legal. Debris Removal and Disposal Once the fence is down, it has to go somewhere. Waste disposal options include renting a dumpster, taking it to a landfill, or hiring a junk removal service. Landfills charge “tipping fees” based on weight, so heavy materials like wet wood or concrete will cost more to dump. Cost Breakdown by Fence Type Different materials require different tools and techniques. Here is a quick look at what you might pay based on what your fence is made of: Fence Type Removal Cost (Per Foot) Why? Chain Link $3 – $5 Easy to cut and roll; highly recyclable. Wood Picket $3 – $6 Lightweight, but takes time to unscrew or pry. Vinyl (PVC) $4 – $7 Plastic panels are light but bulky in a truck. Wrought Iron $5 – $10 Very heavy; requires metal-cutting saws. Privacy Wood $5 – $8 Heavy panels and often deep, sturdy posts. For many, the chain link fence removal cost is the most affordable because scrap metal yards sometimes buy the old mesh, which can offset some of your expenses. Cost Breakdown by Fence Type Different fence types come with different removal challenges. Below is a realistic fence removal price guide based on material. Wood Fence Removal Cost Average cost: $3–$6 per foot Wood panels are easy to dismantle Nails and screws take time to remove Wood fence removal is often the most affordable option. Chain Link Fence Removal Cost Average cost: $4–$8 per foot Steel posts set in concrete raise labor time Scrap metal may reduce disposal costs Chain link fence removal cost is higher due to post extraction and metal handling. Vinyl Fence Removal Cost Average cost: $4–$7 per foot Lightweight panels but fragile connections Concrete footings still add labor Vinyl removal is faster than metal but slower than wood. Metal and Wrought Iron Fence Removal Cost Average cost: $6–$10 per foot Heavy materials Often deeply cemented posts This is the most labor-intensive fence removal option. Additional Costs to Consider When planning your budget, don’t forget the “extras” that often pop up during a project. Cost to remove and replace fence: If you are putting a new fence up immediately, many companies offer a “tear down and install” package. This is often cheaper than hiring two different companies. Post hole restoration: Once the posts are gone, you’re left with deep holes in your yard. Filling these with dirt and tamping them down is extra work, but it keeps your yard safe. Landscaping repair: If a heavy truck or bobcat has to drive on your lawn, you might need to budget for some new grass seed or sod. Hazardous materials: Old wooden fences from decades ago might

What Size Dumpster Do I Need? Expert Guide to Dumpster Sizes

If you are planning a cleanup, remodel, or construction job, one question always comes up first: what size dumpster do I need? It sounds simple, but the answer depends on many things like debris type, weight, space, and how much trash you really have. People often guess and end up with a dumpster that is too small or way too big. Both mistakes cost money and time. This guide is written to help homeowners, renters, contractors, and event planners make the right call the first time. We will walk through dumpster sizing step by step, using plain language and real examples. By the end, you should feel confident choosing the right dumpster size for your project. What Does “Dumpster Size” Really Mean? When people talk about dumpster size, they are usually talking about cubic yard capacity. A cubic yard is a unit of volume. One cubic yard is about the size of a washing machine. Most roll off dumpster sizes range from 10 to 40 cubic yards. Dumpster size is not just about how much fits inside. It also includes: Dumpster dimensions (length, width, height) Weight limit set by the landfill The type of debris you plan to throw away Where the dumpster will be placed Standard dumpster dimensions matter because space can be tight. A driveway placement that works for one home may not work for another. This is why two dumpsters with the same cubic yard capacity may still feel different on-site. Dumpster Size Understanding what dumpster size really means helps answer the bigger question of what size dumpster do I need without guessing. Let’s break down the different dumpster sizes and what they’re actually good for. This chart gives you the real dimensions and helps you picture what fits inside. 10-Yard Dumpster Typical dimensions: 14 feet long × 7.5 feet wide × 3.5 feet tall Holds: About 10 cubic yards or roughly 4 pickup truck loads Weight limit: Usually 2-3 tons Best for: Small bathroom remodels, garage cleanouts, yard debris from trimming trees or removing a small deck Real-world example: Cleaning out a one-car garage or replacing 1,500 square feet of carpet 15-Yard Dumpster Typical 15 yard dumpster size: 16 feet long × 7.5 feet wide × 4.5 feet tall Holds: About 15 cubic yards or roughly 6 pickup truck loads Weight limit: Usually 2-3 tons Best for: Medium cleanup projects, removing old flooring from several rooms, small estate cleanouts Real-world example: Tearing out a kitchen (cabinets, counters, and flooring) or clearing out a basement with old furniture 20-Yard Dumpster Common 20 yard dumpster dimensions: 22 feet long × 7.5 feet wide × 4.5 feet tall Holds: About 20 cubic yards or roughly 8 pickup truck loads Weight limit: Usually 3-4 tons Best for: Large home renovations, roof replacements for small to medium homes, whole-house carpet removal Real-world example: Replacing a 3,000 square foot roof or gutting and remodeling two bathrooms 30-Yard Dumpster Typical dimensions: 22 feet long × 7.5 feet wide × 6 feet tall Holds: About 30 cubic yards or roughly 12 pickup truck loads Weight limit: Usually 4-5 tons Best for: Major home additions, large construction debris projects, whole-home cleanouts Real-world example: Building a large deck, removing siding from an entire house, or major estate cleanouts 40-Yard Dumpster Typical dimensions: 22 feet long × 7.5 feet wide × 8 feet tall Holds: About 40 cubic yards or roughly 16 pickup truck loads Weight limit: Usually 5-7 tons Best for: Commercial projects, complete home gut-jobs, new construction sites Real-world example: Tearing down a large shed or garage, commercial building cleanouts When looking at different size roll off dumpsters, remember that the “yard” number tells you volume, not actual size. A container’s shape might vary, but the capacity stays the same. Read More: How Much Does a Dumpster Rental Cost? How To Estimate Your Dumpster Needs If you are asking, how do I know what size dumpster I need, start with trash estimation. This means taking a close look at what you plan to throw away. Step 1: List Your Debris Write down everything going into the dumpster. Are you tossing old furniture, drywall, wood, or yard debris? Different materials take up space in different ways. Step 2: Think in Pickup Loads One pickup truck load equals about 2 to 3 cubic yards. 3 pickup loads = 10 yard dumpster 6 to 7 pickup loads = 20 yard dumpster This method helps visualize volume without measuring. Step 3: Plan for Extra Most cleanup projects grow as you work. Hidden junk, broken materials, and last-minute changes add up. Choosing a slightly larger dumpster size can save you from needing a second rental. Material-Based Weight Considerations   Here’s something that catches people off guard: you can’t always fill a dumpster to the top. The culprit? Weight limits. Every dumpster rental comes with a weight limit measured in tons. Go over that limit, and you’ll pay hefty overage fees sometimes $50-100 per extra ton. Understanding your materials disposal needs prevents these surprise charges. Lightweight materials (can fill the dumpster completely): Household junk and furniture Yard debris like branches, leaves, and grass Drywall and wood Carpet and padding Cardboard and paper waste Medium-weight materials (fill about halfway to two-thirds): Mixed home renovation waste Doors and windows Kitchen cabinets Vinyl siding Fencing Heavyweight materials (fill only one-third or less): Concrete and asphalt Brick and stone Dirt and soil Roofing shingles Tile and hardwood flooring (large amounts) Let’s look at a real example: You’re replacing your roof. A typical 2,000 square foot roof generates about 2-3 tons of shingles. A 20-yard dumpster has a 3-4 ton limit, which sounds perfect. But here’s the catch you can only fill that 20-yarder about one-third full with shingles before hitting the weight limit. Some companies offer special “heavy debris” dumpsters for roofing and concrete these are shorter but have higher weight limits. For construction site waste mixing light and heavy materials, load strategically. Put heavy stuff on the bottom and lighter materials on top.

How to Insulate a Garage: A Complete Homeowner’s Guide

Insulating a garage is one of those home projects that sounds simple until you actually look into it. Some people do it to stay warm in winter. Others want to protect stored items, reduce energy bills, or turn the garage into usable space. The problem is that most advice online skips over the real questions homeowners have, like whether insulation is even worth it for their garage, what type actually works, and how much it really costs. This guide walks through everything you need to know about insulating a garage, from deciding if it makes sense to choosing materials, understanding R-values, and avoiding common mistakes. Whether you plan to do the work yourself or hire a professional, you’ll leave with a clear plan instead of guesswork. Do You Really Need to Insulate Your Garage? Before getting into materials and steps, it’s worth asking a simple question: do you actually need to insulate your garage? The answer depends on how your garage is built and how you use it. Attached vs detached garages If your garage is attached to your house, insulating it usually makes sense. Heat moves easily through shared walls and ceilings. A cold garage can make nearby rooms harder to heat in winter and hotter in summer. Insulating garage walls and ceilings can reduce that energy loss and improve comfort inside the home. Detached garages are different. If you only use the space for parking and basic storage, insulation may not provide much benefit. But if you spend time out there or store temperature-sensitive items, insulation can help stabilize conditions. How you use the space Insulating a garage makes the most sense if you: Use it as a workshop or home gym Store tools, paint, or electronics Have plumbing that could freeze Plan to convert it into living space Want better temperature control year-round If the garage is rarely used and completely separate from the house, insulation may not be a priority. How Much Does It Cost to Insulate a Garage? Budgeting is where most homeowners get stuck. In 2026, material prices have stabilized, but labor remains at a premium. Here is a breakdown of what you can expect for a standard 2-car garage (~400 sq. ft.). 2026 Cost Comparison Table Material Type Material Cost (per sq. ft.) Total DIY Cost (Est.) Professional Cost (Installed) Fiberglass Batts $0.40 – $1.50 $800 – $1,200 $1,800 – $2,500 Mineral Wool $1.40 – $3.50 $1,300 – $1,900 $2,400 – $3,200 Rigid Foam Board $1.00 – $2.50 $900 – $1,500 $2,000 – $3,000 Spray Foam (Closed Cell) $1.50 – $4.50 N/A (Pro only) $3,500 – $6,000 PRO TIP: When calculating how much does it cost to insulate a garage, don’t forget to budget $200–$400 for a dedicated garage insulation kit for your door. It is the single most important part of the project. How Do I Prepare to Insulate My Garage? Preparation is the difference between a project that lasts 30 years and one that rots your studs in five. Declutter the Perimeter: You need full access to the wall studs. Remove all shelving, hooks, and wall-mounted racks. The “Leak Audit”: Insulation stops heat transfer, but it doesn’t stop air. Use a can of expanding foam to seal gaps where wires penetrate the top plate and around window frames. This is a critical step in how to insulate a garage effectively. Moisture Check: Look for “efflorescence” (white powdery salt) on concrete walls. If your garage has moisture issues, you must fix the exterior drainage or apply a waterproof masonry sealer before installing batts. What Type of Insulation Should I Choose?   Choosing the right garage insulation r value depends entirely on your climate. R-value measures a material’s resistance to heat. Fiberglass Batts: The go-to for insulating garage walls. It’s DIY-friendly but requires a vapor barrier in cold climates. Mineral Wool: Brands like Rockwool offer superior fire resistance and soundproofing. It doesn’t sag over time and repels water. Reflective Foil: In places like Florida or Arizona, the best way to insulate a garage door is using radiant barriers to reflect the sun’s heat back outward. Recommended R-Values for 2026 Walls: Aim for R-13 to R-15 in the South; R-19 to R-21 in the North. Ceilings: Aim for R-30 to R-40. What Are the 6 Steps to Insulate a Garage? Follow this checklist to ensure a professional-grade finish. Step 1: Seal the Gaps Before you touch the insulation, seal every crack. Use high-quality caulk for small gaps and expanding spray foam for larger holes around plumbing and electrical outlets. Step 2: Install Attic Baffles (Ceiling Only) If you are insulating the ceiling, you must maintain airflow to your roof. Staple foam baffles (rafter vents) to the roof sheathing to prevent your new insulation from blocking the soffit vents. Step 3: Fit the Insulation Snugly When how to insulate garage walls, “snug” is the keyword. Cut your batts about a half-inch wider than the stud cavity. Tuck them in so they are flush with the studs. Crucial: Do not compress the material. Squishing insulation kills its R-value by removing the air pockets that trap heat. Step 4: Add the Vapor Barrier In colder regions, stapling a 6-mil poly vapor barrier over the studs prevents your breath and car exhaust moisture from condensing inside the walls, which leads to mold. Step 5: Insulate the Garage Door The door is a giant thermal hole. Use a specialized garage insulation kit or cut rigid foam boards to fit the panels. This is often cited as the best way to insulate a garage door because it significantly reduces the vibration and noise of the door as well. Step 6: Cover with Fire-Rated Drywall In most jurisdictions, you cannot leave insulation exposed. It is a fire hazard. Install 5/8-inch Type X drywall. Not only is this safer, but it also gives your garage a finished, professional look. Common Garage Insulation Mistakes Even good materials won’t help if installation is done poorly. Skipping air sealing: Insulation without air sealing allows

How to Recycle a Blender: A Complete Guide

If you have a broken blender or an old appliance gathering dust in your kitchen, you’re probably wondering: how to dispose of a blender safely and responsibly. While it might seem easy to toss it in the trash, doing so can harm the environment, waste valuable materials, and even violate local regulations. Blenders contain a mix of plastic, glass, metal, and electronic components each requiring different handling. In this guide, we’ll walk you through everything you need to know about recycling, disposing of, or repurposing your blender. We’ll answer common questions like How to Recycle a Blender?, how to get rid of an old blender, and share practical tips that make the process simple and safe. Why You Can’t Just Throw a Blender in the Trash Blenders may seem harmless, but most small appliances fall under the category of electronic waste (e-waste). Tossing them in landfills can have serious consequences: Toxic materials: Motors, wiring, and electronics can contain heavy metals or other toxins that leach into soil and water. Non-biodegradable components: Plastic and glass take decades or even centuries to decompose. Wasted resources: Metals and certain plastics can be recycled into new products, but throwing them away wastes these materials. Because of these reasons, understanding how to dispose of a blender properly is essential. Simply dropping it into a curbside recycling bin rarely works; most municipal programs do not accept small electronics. Understanding Blender Materials Before recycling, it helps to know what makes up your blender. Each part may require different handling: Glass jars: Most blender jars are made from tempered glass, which is recyclable. Some recycling programs accept glass directly, while others prefer it separated from electronics. Plastic parts: Lids, jar bases, and smaller accessories may be recyclable depending on local guidelines. Check the recycling symbol to confirm. Metal components: Motors, blades, and screws are valuable for metal recovery. Blades should be handled carefully due to sharp edges. Electronics: Motors, wiring, and switches fall under e-waste. These should never go into regular recycling bins and require specialized disposal. Tip: Disassembling your blender into these components before recycling makes the process smoother and safer. Options for Recycling or Disposing of a Blender There are several avenues to get rid of your old or broken blender responsibly. 1. Local Recycling Programs Many cities and municipalities have special programs for e-waste or small appliances. These programs often provide: Drop-off locations for small electronics. Scheduled curbside pick-up days for e-waste. Guidelines for separating materials (plastics, metals, electronics). How to check: Visit your city’s waste management website or call your local recycling office. They can tell you if your blender qualifies for their program. 2. Electronic Waste Centers E-waste centers specialize in recycling electronics safely and efficiently. They: Properly dismantle motors, wiring, and electronic circuits. Recycle metals and plastics to create new products. Often accept items free of charge or for a small fee. Some e-waste centers also provide tax credits or trade-in incentives, making it easier to get rid of appliances responsibly. 3. Retail Take-Back Programs Many retailers and appliance brands offer take-back programs for old electronics and appliances. Examples include: Best Buy: Offers in-store drop-offs for small appliances and electronics. Major blender brands: Some accept old appliances through mail-in or in-store recycling. Check your local store or the manufacturer’s website to confirm whether your blender is eligible. This method is convenient if your appliance is too heavy or bulky to transport to a recycling center. 4. Donation or Repurposing If your blender is still functional but old, donation can be a great option: Donation options: Schools, shelters, or community centers often accept small appliances. Repurposing: Even broken blenders can be repurposed. Glass jars can become storage containers, or motors can be used in DIY projects. This not only keeps appliances out of landfills but also benefits communities or hobbyists looking for inexpensive materials. Step-by-Step Guide to Prepare Your Blender for Recycling Before taking your blender to a recycling facility or drop-off location, follow these steps to ensure safe and effective disposal: Unplug and disassemble: Remove the jar, lid, blades, and base. Clean thoroughly: Any leftover food can contaminate the recycling process. Separate components: Divide plastics, metals, glass, and electronic parts. Package safely: Wrap sharp blades and motors to prevent injury during transport. Choose the right recycling method: Take each part to the appropriate facility or program. Environmental and Practical Benefits of Recycling Blenders Recycling blenders has both environmental and practical benefits: Reduces landfill waste: Electronics and plastics take decades to decompose. Proper disposal prevents this buildup. Recovers valuable materials: Metals, plastics, and glass can be recycled into new products, reducing the need for virgin resources. Supports sustainable living: By properly disposing of appliances, you contribute to a circular economy where materials are reused rather than wasted. Even a small appliance like a blender can make a noticeable difference when disposed of responsibly. Common Mistakes to Avoid When recycling a blender, people often make mistakes that reduce efficiency or cause safety issues: Throwing it in the curbside bin: Most curbside programs do not accept electronics. Not cleaning the blender: Food residue can contaminate recycling streams. Leaving blades exposed: Sharp components can injure workers at recycling facilities. Mixing electronics with general plastics or metals: This complicates recycling and may lead to contamination. Following proper steps ensures your blender is recycled safely and effectively. We Take All kind of Junk At Junk Masterz, we make it simple to get rid of unwanted items, no matter the size or type. Whether it’s a broken blender, old kitchen appliances, furniture, electronics, or general household junk, we handle it all safely and responsibly. Our team ensures that everything we collect is recycled or disposed of properly, helping you declutter while protecting the environment. Wondering exactly what we accept? Visit our What We Take page to see the full list of items we remove. From small appliances like blenders to large furniture, we take care of everything so you don’t have to lift a finger. Ready to get

How to Dispose of a Dehumidifier Safely and Responsibly

If you’ve recently upgraded your home or no longer need your dehumidifier, you may be wondering, “How do I get rid of it safely and responsibly?” Dehumidifiers are heavy, contain electrical components, and often house chemicals that shouldn’t end up in a landfill. Proper disposal is essential not just for safety but also for sustainability. In this guide, we’ll walk you through every step of safely disposing of a dehumidifier, explore recycling options, and answer common questions like whether you can use dehumidifier water for plants. Why Proper Dehumidifier Disposal Matters Before diving into the methods for disposal, it’s important to understand why throwing a dehumidifier in the trash isn’t a good idea. Improper disposal can cause environmental damage, pose safety risks, and even violate local regulations. Environmental Impact Dehumidifiers contain several materials that can be harmful to the environment if not handled properly. Plastic components can take hundreds of years to break down, and the refrigerants used in many units can contribute to greenhouse gas emissions if released. Even the water collected in the tank can contain dust and trace metals, which aren’t ideal to pour into the soil or down drains. By learning how to recycle dehumidifiers, you can ensure that as many components as possible are reused or safely processed, reducing your household’s ecological footprint. Safety Concerns Electrical appliances like dehumidifiers are heavy and can be dangerous if mishandled. Units often contain metal coils and fans that can cause cuts, and many models include refrigerants that need professional handling. Dropping a unit or attempting to dismantle it incorrectly can lead to injury or property damage. Following proper disposal steps ensures your safety and the safety of those handling the appliance after you. Ways to Dispose of a Dehumidifier Now that you understand why disposal matters, let’s explore your options. The right method depends on the condition of the unit and the resources available in your area. Donate or Sell If your dehumidifier still works, consider donating it or selling it. Local charities, thrift stores, or shelters often welcome functioning appliances. Online marketplaces like Craigslist, Facebook Marketplace, or local buy-and-sell groups can also be effective. Not only do you give your old dehumidifier a second life, but you also help someone in need while avoiding unnecessary waste. This approach is a practical answer for those searching for “how to get rid of a dehumidifier” quickly and responsibly. Recycling Options For units that are broken or too old to donate, recycling is the best option. Many regions have e-waste recycling facilities specifically designed to handle large appliances. These facilities safely extract metals, plastics, and refrigerants for reuse. Some manufacturers also offer take-back programs, accepting old appliances when you purchase a new unit. Step-by-step guide to recycling a dehumidifier: Check with your local municipality or waste management company for approved e-waste recycling centers. If available, contact the manufacturer for a take-back program. Prepare the dehumidifier by draining all water and removing filters. Transport the unit to the recycling center, ensuring any hazardous components are handled according to their instructions. Bulk Trash or Municipal Pickup Some cities allow large appliances to be picked up as part of scheduled bulk trash or curbside programs. The process usually involves scheduling a pickup and possibly paying a small fee. This option is convenient if you don’t want to transport the unit yourself, but it’s essential to verify your local rules. Some municipalities require certification that refrigerants have been safely removed, so check before placing your dehumidifier at the curb. Professional junk removal Junk removal services often recycle appliances correctly. This option works well for people handling multiple large items, though it usually costs more. Each option answers the question of how to dispose of dehumidifier units in a responsible way, without cutting corners. Utility company programs A few electric utility companies offer appliance recycling incentives. These programs focus on energy savings and may offer a small rebate for turning in old units. Can You Use Dehumidifier Water for Plants? Technically, dehumidifier water is distilled water, making it low in minerals. However, it may contain small amounts of dust, mold spores, or metals from the unit itself. If you decide to use this water for plants, it’s best for non-edible houseplants rather than vegetables or herbs. To be safe, consider filtering or boiling the water before use. Preparing Your Dehumidifier for Disposal This step-by-step guide breaks the process into simple actions. Follow these steps to avoid stress and mistakes. Step 1: Check if the dehumidifier still works Plug it in and test basic functions. If it removes moisture and runs without strange noises, donation or resale may work. Step 2: Clean the unit Empty the water tank and let it dry. Wipe dust from vents and coils. Clean units attract donors and recyclers alike. Step 3: Look up local rules Search your city or county waste authority page. Many areas list appliance disposal rules and approved recycling centers. This step matters since rules differ by location. Step 4: Choose a disposal method Pick recycling, donation, or professional removal based on your findings. Avoid curbside trash unless your local authority allows it, which remains rare for appliances with refrigerants. Step 5: Transport safely Keep the unit upright during transport. Tilting can cause oil or refrigerant movement inside the system. Step 6: Get proof if possible Some recycling centers provide a receipt or confirmation. This record helps if questions arise later. These steps answer how to dispose of a dehumidifier without confusion or risk. How to Recycle a Dehumidifier Properly Recycling answers both environmental and legal concerns. Knowing how to recycle dehumidifier units the right way makes the process smoother. Find certified recyclers Look for recycling centers certified to handle refrigerants. In the U.S., EPA-approved programs follow strict rules for refrigerant recovery. Ask about fees Some centers charge a small appliance recycling fee. This fee covers refrigerant removal and safe processing. Prepare the unit Remove loose parts like filters and water buckets if the recycler asks

How to Dispose of a Toaster Safely: Recycling, Donation, and Disposal Guide

A broken toaster has a way of sitting on the counter like it owns the place. It does not toast, it does not leave, and it quietly waits for someone to deal with it. That moment usually triggers one simple question: how to dispose of a toaster without doing something wasteful or wrong. Tossing it in the trash feels easy, but easy does not always mean right. Small appliances contain metal, wiring, and electronic parts that deserve better handling. In this guide, you will learn clear, realistic ways to get rid of a toaster safely, legally, and responsibly. By the end, you will know exactly what to do, where to take it, and why the right choice actually matters. Can You Throw a Toaster in the Trash? The short answer: sometimes yes, but most of the time, you should not. Many people search for can you throw a toaster in the trash, and the confusion makes sense. A toaster does not look like a phone or laptop, yet it still counts as electronic waste in many areas. The EPA groups small kitchen appliances under e-waste because they contain metal coils, wiring, and sometimes flame-retardant plastics. When tossed into regular trash, these materials end up in landfills where they do not break down cleanly. Some local waste programs allow trash disposal if recycling options do not exist nearby. Even then, landfill disposal sits at the bottom of the EPA waste hierarchy. Recycling or reuse ranks much higher. Before using the trash bin, check your city or county waste page or Earth911’s recycling locator. Many communities offer drop-off sites or special collection days for small appliances. Using those options keeps reusable materials in circulation and reduces landfill pressure. Step-by-Step: How to Dispose of a Toaster Getting rid of a toaster does not require special skills. A few clear steps make the process safe and responsible. Unplug and cool down: Always unplug the toaster and let it cool completely. Heating elements can stay warm longer than expected. Clean out crumbs: Shake out crumbs over a trash bin. This step reduces odors and pests if the toaster goes to recycling or donation. Check working condition: Plug it back in briefly. If it still heats and pops, reuse or donation may fit better than disposal. Look for recycling options: Search for small appliance recycling centers near you. Earth911 and local municipal sites list accepted items. Choose the best disposal method: Based on condition and local rules, decide between recycling, donation, resale, or trash as a last option. Following these steps answers how to recycle a toaster in a practical way while lowering risk and waste. Top Ways to Get Rid of a Toaster Not every toaster needs the same exit plan. Condition, location, and available services all play a role. Recycling Programs Recycling remains the preferred option for broken or outdated toasters. Scrap metal recyclers often accept them because of steel and copper content. Some electronics recyclers also take small kitchen appliances, even if they lack data storage. The EPA notes that recycling metals uses far less energy than mining raw materials. That alone makes recycling a strong choice when available. Retail and Manufacturer Take-Back Some retailers accept small appliances during special recycling events. Big-box electronics stores sometimes partner with certified recyclers. Policies vary by location, so calling ahead helps avoid wasted trips. Junk Removal Services Junk removal companies can haul away old appliances. Many sort items after pickup and send recyclable materials to proper facilities. This option works well during moves or cleanouts. Trash Disposal as a Last Resort If no recycling or reuse option exists, local trash disposal may remain legal. Remove loose parts if possible and follow municipal waste rules. This route answers the common question again: can you throw a toaster in the trash? Yes, but only when better options do not exist. How to Recycle a Toaster Oven A toaster oven follows similar rules, with a few extra details. People often ask how to dispose of a toaster oven because it feels bulkier and more complex. Why Toaster Ovens Count as E-Waste Toaster ovens include heating elements, thermostats, wiring, and sometimes digital controls. According to the EPA, these components place them firmly in the e-waste category. Recycling Steps Unplug and cool the appliance Remove food residue and trays Check for recycling labels or brand guidance Locate a certified e-waste or metal recycler Many recyclers accept toaster ovens as mixed metal appliances. Some may dismantle them for copper wiring and steel housing. Certified Recycling Matters Certified recyclers follow standards that limit environmental harm and worker exposure. Programs following R2 or e-Stewards guidelines align with EPA recommendations. Choosing such recyclers adds confidence that materials get handled responsibly. Using these steps supports anyone searching for recycle toaster oven guidance without confusion or unsafe shortcuts. Can You Reuse or Repurpose a Toaster? Before disposal, reuse deserves a serious look. Reuse extends product life and reduces demand for new manufacturing. Donation If the toaster still works and looks clean, donation works well. Thrift stores, shelters, and community centers often accept small appliances. Each organization sets its own rules, so calling ahead saves time. Resale Online marketplaces allow resale of working toasters at low prices. This option fits people upgrading kitchens or moving. Creative Repurposing Some people repurpose old toasters as planters or storage containers after removing electrical parts. This works best for hobbyists comfortable with basic tools. Safety always comes first. Never leave wiring intact during repurposing. Reuse answers part of how to dispose of a toaster by delaying disposal altogether. The EPA ranks reuse above recycling for good reason. Safety & Environmental Impact Disposing of appliances without thought carries real risks. Understanding those risks explains why proper handling matters. Fire and Injury Risks Damaged cords and heating elements can spark fires if mishandled. Even during disposal, sharp metal edges inside broken toasters can cut hands. Gloves and unplugging reduce these risks. Environmental Effects Landfilled electronics contribute to long-term pollution. While modern toasters contain

How to Dispose of a Hot Tub: Safe and Easy Methods

So, your backyard hot tub has outlived its glory days, and you’re staring at it thinking, “Now what?” Knowing how to dispose of a hot tub properly can save you a lot of hassle. These units are heavy, awkward, and made from a mix of plastics, metal, and foam materials that aren’t just “trash.” Mishandling them can lead to injuries, fines, or environmental headaches. In this guide, we’ll show you exactly how to get rid of a hot tub, whether you want to tackle it yourself, donate, recycle, or hire a professional. By the time you finish reading, you’ll have a clear, safe, and realistic plan to remove your old spa without stress or surprises. Think of it as your step-by-step roadmap to reclaiming your yard and disposing of your hot tub the right way. Why Hot Tub Disposal Is Challenging Hot tubs aren’t like old chairs you can toss onto the curb. Most of these units weigh hundreds of pounds and are full of complicated materials. Manufacturers build them with acrylic shells, metal frames, foam insulation and electrical components. That mix makes them awkward to lift and tricky to break down for disposal. Simply dumping an old unit at the landfill may not be allowed in your area, and leaving leftover water with chemicals like chlorine or bromine running into the soil can create real environmental problems. Most municipal garbage services don’t accept bulky items like hot tubs on regular pickup days. Some areas even require that water flushed from pools or spas drain only to specific sewer lines, not to storm drains or natural water sources. That’s why many homeowners who ask how to dispose of an old hot tub find themselves juggling rules, safety steps, and a lot of heavy pieces. How to Get Ready for a Hassle-Free Hot Tub Removal Preparing before your hot tub is removed makes the process smoother, safer, and faster. Whether you plan a DIY approach or are waiting for a professional team, taking a few careful steps upfront saves time, reduces risk, and prevents unexpected costs. Here’s a complete checklist to get ready for hassle-free hot tub removal. Clear the Surrounding Area Hot tubs are bulky and heavy. Remove all obstacles around the unit, including furniture, planters, decorative rocks, or garden features. Clearing a path of at least four feet ensures easy access for lifting equipment or moving the tub. Protect delicate surfaces with boards or blankets to prevent scratches or damage during the removal process. Turn Off Power and Water Electricity and water make hot tubs dangerous if handled carelessly. Switch off the dedicated breaker and unplug the hot tub if possible. Also, turn off any connected water lines. If your hot tub is hardwired, having a licensed electrician inspect the wiring ensures safety during removal. This is especially important for older tubs with unknown electrical modifications. Drain the Water Completely A full tub can weigh hundreds of pounds more than an empty one. Use the tub’s drainage valve or a submersible pump to remove all water. Make sure the water drains into a proper sewer line or approved area—never into storm drains or natural waterways. Residual chemicals like chlorine or bromine can contaminate soil and water if discharged improperly. Check Local Permits and Disposal Rules Many cities and municipalities require permits or scheduled bulky waste pickups for hot tub disposal. Check your local ordinances to confirm whether you need a permit or must use specific disposal facilities. Compliance avoids fines and ensures your hot tub ends up in a responsible, environmentally-friendly way. Communicate Special Access or Equipment Needs If your hot tub is in a tight corner, on a slope, or behind landscaping obstacles, let your removal team know in advance. They may need ramps, dollies, or additional personnel to safely handle the tub. Providing these details reduces delays, prevents damage, and keeps the removal process smooth. Additional tip: Taking photos of the tub and surroundings for your team can help them plan equipment and manpower needs ahead of time. Optional: DIY Prep Tips Even if hiring a team, doing small prep work like detaching removable panels, clearing debris, or organizing helpers can reduce labor time. These steps ensure a safer and quicker hot tub removal while giving you a chance to handle any unexpected obstacles before the team arrives. Hot Tub Disposal Methods There isn’t one single answer to how to get rid of a hot tub. The right choice depends on the tub’s condition, your budget, and how much effort you want to invest. Sell or Give It Away If the hot tub still works or only needs minor repairs, selling it can offset removal costs. Functional units can fetch a fair price on local classifieds sites, and willing buyers might handle removal themselves. Another idea is to offer it for free. Some people are happy to pick up a tub if they think they can fix or reuse it. Make sure they actually move it and don’t just leave it in your yard longer. Donate Some community groups or hobbyists accept hot tubs that are still operable. Donation centers might even offer pick-up services for large items. Always check first with the organization about condition and transport requirements. Professional Removal Service Paying for a removal crew is the easiest way to get rid of hot tub without handling the heavy work yourself. Professionals take care of disconnecting power, cutting apart the unit if needed, hauling it out, and disposing of materials in compliance with local regulations.  Typical costs range widely depending on where you live and how hard the job is, but most homeowners spend somewhere between $300 and $800 for full removal and disposal. Also Read: How Much Does It Cost to Remove a Hot Tub Recycling Hot tubs contain materials that recycling facilities will accept, such as metal frames and some plastics. Recycling keeps those materials out of landfills. It can take a bit of planning because different parts may need to go

Color Palette